Thursday, March 24, 2011

Cream of Asparagus Soup

I have never attempted to make a cream soup before.  See, there's always blending involved and I don't own a food processor, and my blender is not so hot.  But I was determined to make Cream of Asparagus Soup, and it turned out pretty darn delicious if you ask me!  Best of all if took maybe 45 minutes to make, and I'm sure if you were a little better prepared than I was, you could easily have it done sooner.

What You Need
1 onion, chopped
1 Tbl margarine or butter
2 Tbl flour
Salt
4 Cups low sodium chicken broth
1.5 lbs of asparagus, finely chopped
1 Cup milk, or half and half, or whipping cream


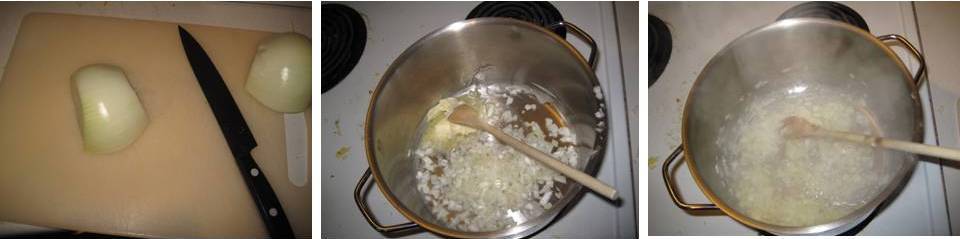
Chop onion and saute in margarine in a large
stock pot until translucent, about 5 minutes. 

Add flour and cook for about 1 minute. 
Add chicken broth stirring and scraping any browned onions.  Cook for about 5 minutes.

Meanwhile, chop asparagus.  Add asparagus to broth mixture and cook for 7-10 minutes, until the vegetables are tender.  This really adds the flavour of the soup, allowing the veggies and the broth to simmer together!  Plus since you're not steaming it, or cooking it in another pot and then adding it in, you're keeping all the nutrients from the vegetable in the soup!


In batches, puree the soup in a blender or food processor.  If using a blender, ensure to pulse the soup a few times before letting the blender run continually.  This will help relieve some of the pressure inside the blender and will keep the soup from exploding all over your kitchen.

If you're making a BIG batch of soup, you can freeze
it at this step.  Then when you want to use it
simply follow the final step!

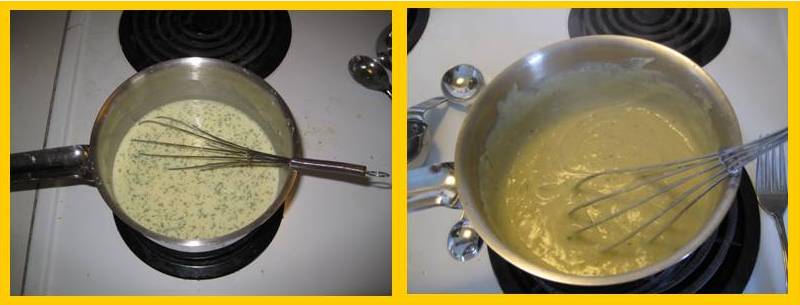
Once the soup is pureed, return to stock pot and add cream. Heat through to a simmer and cook for about 5 minutes.
Serve with croutons!
So fast, so delicious! 
I highly recommend you give this
quick and easy cream soup a try!


Linking Up To:

Thursday, March 17, 2011

Prairie Story Peanut Butter Cookies


If you're from the Canadian (or US) prairies, you need to check out Prairie Story.  Alison is such a sweetheart. Every Thursday she hosts Recipe Swap Thursday. It's a great place to find tonnes of new ideas for dinner, or lunch....or dessert for that matter.  Additionally on Thursday she starts off the Link Party with one of her amazing recipes. 

I had yet to try my hand at one of
Alison's creations, until now!

Prairie Story Peanut Butter Cookies

What You'll Need
1/2 C shortening
1 C peanut Butter
2 C brown sugar
2 eggs
1 tsp vanilla
1 Tbls vinegar
2 C flour
1 tsp salt
2 tsp baking soda

Cream together shortening, peanut butter and brown sugar.  Leave your shortening out at room temperature for a while, it will make it easier to cream!


Beat in eggs and vanilla.  Then stir in vinegar.

Mix in flour, salt and baking soda.
I would recommend mixing in the flour 1 cup at a time.  I mean unless you're super woman and have amazing biceps!

Roll into one inch balls and place on baking sheet. 

Press down with a fork to make a crossed pattern
I dunno what it is, but this criss cross patter is what make pb cookies unique!  I was so shocked to see that someone else did this too!  My Gramma and Mum both pressed peanut butter cookies with a fork too!


Bake @ 375 for 7-8 minutes until edges brown.
I made my cookies pretty big so the
recipe only yielded 24 cookies instead of 36!


The baking time is perfect, because it keeps
the cookies soft and brownie-like on the inside.
Needless to say these cookies didn't stick around my house very long! I bet they'll disappear just as fast at your house!

Tuesday, March 15, 2011

I'm an Awesome Blogger


Did you know I'm an awesome blogger?  Ya me neither!
Well at least it's nice that someone else thinks so!


For her big birthday celebrations, the very sweet Jill from Envirocraftiness decided to count down 25 of her favorite blogs and I'm one of them!  Isn't that so precious?! 
I'm very proud to be included with the likes of
Flamingo Toes, Tatertots and Jello, Someday Crafts, and many other wonderful and inspiring blogs. 

A big thank you to Jill for featuring me :)  Feels so great to be loved!  For a full list of Jill's 25 favourite blogs, head on over to Envirocraftiness and discover a sparkly new blog!

Thursday, March 10, 2011

Advetures in Decoupaging


I have never decoupaged before, but from what I'd read, it seemed pretty easy.  So I had a brilliant idea when watching the luggage carousel at the Vancouver International Airport.  SO many people try to make their standard black suitcase stand out in a sea of black suitcases....but rainbow coloured suitcase belts are not my idea of cute.  So I thought it might be a good idea to create decals or stickers that I could create myself and apply to my plain old black suitcase.

So in true Leslie style, I started gung ho, clipping out images, thinking "boy this is gonna look so cute on my suitcase.  I have a big plastic bottom I can decoupage and I'll be able to tell my suitcase apart from everyone elses!"  So I gathered up the images I had found and got my glue and went upstairs to where my suitcase was waiting......only to realize that my (new) suitcase does not have a plastic bottom, like my old heavy suitcase. Dang! 
My brilliant plan was not so brilliant any more.

So I decoupaged on what little plastic existed....around the wheels and the bottom.
This isn't what I had hoped to create :( But hopefully this will help me find my bag a bit easier...since I'm headed to MEXICO tomorrow (Thursday!).  If I have time I hope to create my own cute fabric luggage tags-again to assist in finding my bag on the luggage carousel....
but probably not before I leave.

Our Resort!
If you're totally jealous of me, you should be!  I'm headed to the Dreams Villmagna Resort in Nuevo Vallarta Mexico! 
The Room! Complete with furnished balcony and outside Jacuzzi!

Ty & I will be down there for a week.  I've been indoor tanning to ensure I'm not totally see-through, and almost every inch of my body has been waxed in anticipation for the trip!  If you're a glutton for punishment, I'll post some of my pics when I get back!

Tuesday, March 8, 2011

Fabulous Feature


OK, so let's just all agree that we're in love with flowers?  They're everywhere!  Any kind, any shape, any colour, and I might add any medium!  Flowers have really come to life by creating flowers that never die!  And these beauties I'm featuring today are to die for!


I have such a hard time making fake flowers.....I'm not a very good instruction reader, and I always feel like mine never quite turn out like the picture?  Or is that just me?  Oh well.  I got inspired to try my hand again at paper flowers from Kim at Too Much Time on My Hands!  Aren't they beautiful?  I really love the arrangement.  I've been to a few wedding shows this year already and the BIG trend is tall center pieces = expensive!  This is a perfect idea for a financially frugal bride to creat the same dramatic look for WAY less!  It's definitely got my brain buzzin'. 

For the full tutorial check out Kim's Blog!


Sunday, March 6, 2011

Chicken Divan

My Mum, God bless her, always talks about the great food that she and my sister make, and she always says she's gonna email me the recipes.....problem is she never does. In fact she has a recipe for a roast pork rub that I've been dying to try for a while....Needless to say I'm still waiting.

Anywho, she sent me this recipe the other day and I got a chance to try it out. It's right up my alley, and yours, because you probably have most if not all these ingredients in your house at anytime!

What you need
2-4 Skinless, boneless chicken breasts, halved
3 Cups broccoli florets
1/2 C flour
2 Tbls powdered chicken stock
1 tsp salt
1/2 tsp pepper
4 C milk
1/2 C grated Parmesan cheese

Place broccoli in slow cooker and lay halved chicken breasts on top.  I did not have enough broccoli FYI.


Stir together flour, boullion powder, salt and pepper in a sauce pan.

Gradually whisk in milk until no lumps remain.  Heat & stir until boiling and thickened. Remove from heat. 
Stir in cheese.

Pour over chicken and broccoli.

Cover and cook on low for 6-8 hours or on high for 3-4 hours.  I cooked this for 4 hours on high and mine burnt around the edges, so if you have time do the low setting!

Man was the chicken ever tender...I sometimes forget how amazing the slow cooker is for sealing in moisture! 
It's like a sauna for food!

Serve over hot pasta or rice.
It's so delicious and simple I still can't believe it.  My apologies for no finished shots.  It was one of those days where I got dinner ready and when it was ready I ate it instead of taking pictures of it! Whoops!


Linking Up To 


UndertheTableandDreaming
Sister Sister Sunday