Wednesday, September 28, 2011

Stashbusting Feature


Hola!  While today I haven't much time to explain my absence (this will come, I promise...if you care to read check back soon), but I did want to share with you my feature over at The T-Shirt Diaries as part of the Upcycled Awesome! 

 Check out my feature here!  Honestly, I'm so surprised when people like the things I make-makes me feel so validated.  Thanks Robin!

Monday, September 19, 2011

Stashbusting September


Hola chicas! I'm very excited to announce that I am guest posting over at The T-Shirt Diaries today as part of Stashbusting September! If you have a lot of scrap scrapbook paper lying around, you'll definitely want to check out my post!

What are you waiting for?
Hurry those buns over there!

Sunday, September 18, 2011

Salad Sunday

Well folks, we may or may not hit 30 Salads by the end of September, but hey, I know I've been inspired to try a few different recipes and really that's what I was aiming for!  So on this Salad Sunday I'm featuring my Corn, Tomato & Black Bean Pasta Salad.  Actually, this recipe is originally from Nadia Potts, former ballerina with the National Ballet of Canada.  Her recipe is served hot with crumbled feta cheese; I nixed the cheese and turned it into pasta salad.

Nadia Potts' Corn, Tomato and Black Bean Salad

What You'll Need
2 cans of kernel corn
1 large can of black beans
3 tomatoes, diced (You can use cherry tomatoes, halved)
2 green onions, minced
Fresh minced Cilantro (to your liking)
2-3 cloves of garlic, minced
2-3 cups dry pasta

Cook the pasta al dente in salted water.  Chill pasta while you get the rest of the salad ready.

Dice tomatoes

 Add in corn


Add the black beans and stir to combine.

Then add in the cilantro, garlic and green onions. 

I would also recommend adding salt and pepper to your personal preference at this point.  Stir it all up into a lovely blend of colour and flavour!


Let this veggie mixture sit either at room temperature or in the fridge for at least 20 minutes.  Then mix the veggies with the pasta and chill for another 15 minutes. 

Then dig in!  I made a MASSIVE salad.  I think Ty and I had it for at least 3 meals each!  It keeps really well, especially if you don't overcook your pasta!  Let me know if you try this salad and what you think of it.  Bon Appetit.

Thursday, September 15, 2011

Fish Veracruz

When Ty and I were on vacation in Puerto Vallarta this past May we stumbled upon a delicious dish I've been dying to make ever since we got back!  Fish Veracruz. 
Some days I wonder about this guy.  Just kidding, look at how cute he is in pic #3! 
I'm sure he'll be impressed that I used these!

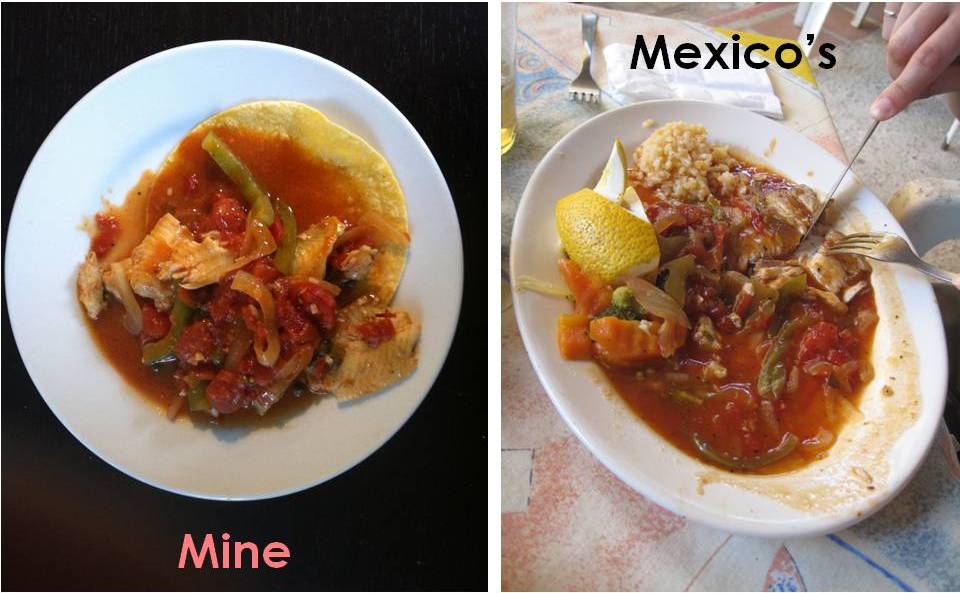
If you google this recipe you'll be able to find many variations, mostly using a white fish in tomato sauce with olives, oregano and capers. None of the recipes I was able to find reminded me of what we ate in Puerto Vallarta. Here's a pic of what we had...
I didn't remember eating any olives or capers....so I was worried that this was one of those dishes I wouldn't be able to replicate.  But with some creative recipe blending and blind faith I created a really tasty version that I think is pretty close to the original!

What You'll Need
Vegetable oil
3-4 gloves minced garlic
Chili Powder
Taco Seasoning
Ground Cumin
1 medium onion
1 large green pepper
1 large can diced tomatoes
chopped pickled jalapeno peppers
capers (optional)

Pour some oil in a deep skillet and allow to heat.  Throw in garlic along with spices.  I used at least 1 tsp of chili powder, maybe 2 tbls of taco seasoning and a dash of cumin.  Once this is fragrant add in onions and green pepper and cook until tender.


Next up, dump in the can of tomatoes and bring to a boil. 
This is when I added the jalapenos.

 Simmer for a bit, maybe 5 minutes, and then add in your fish.  I used el-cheapo $8 frozen cod from Wal-Mart.  No joke.  I saw the fish at Wal-Mart and thought "Hmmm, hopefully it's not totally awful" and bought it!  I did partially thaw it before I put it into the sauce, which really lessened my cooking time!

If you want you can add those capers in now (I did).  Continue to simmer, covered for 10 minutes max (depending on the thickness of your fish, this will vary).  Then  it's time to eat.  You can serve this with rice, but I made a lot of fish so we just had it with mini corn tortillas on the side for the juice.


It is SOOOOOOO good!  It really reminded me of the version Ty and I had-Mission Accomplished!  My version was definitely spicier than the original, but that was fine with both of us!  This meal was so quick and easy to make it's going to be hard NOT to make it every week!

Miz Helen’s Country Cottage


Wednesday, September 14, 2011

Twig Vase

Another Pinterest inspired project.  Actually it was originally a Martha Stewart project but I found it on Pinterest.  This also happens to be a Stashbusting September project since I had left over twigs from the wreath I made last year! 
I was looking for something to so with those things!

It starts with a plain ole aluminum can which I wrapped in painter's towels from another project from last year. 
First I glued vertically along the length of the can.

Then I carefully glued around the bottom lip of the can and wrapped the fabric around.

Then I overlapped the fabric and glued it down, making sure to have a nice vertical seam. 

Next I folded over and glued the fabric inside the can to hide the sharp edges.  If you're planning to use this as a vase don't let the fabric go too far down into the can, or else it will get wet. 

Then start gluing those twigs.  This takes a lot of glue, so be sure to have extra glue sticks near by for refills!

Some twigs won't be perfectly straight which is why I covered the can, so even if there were gaps you wouldn't see metal.  I used some really small twigs to fill in large gaps once it was all done.  I recommend trying to line up the twigs before you glue them down to get a nice pattern and not have one really curved twig next to a perfectly straight one.

To make sure the twigs didn't scratch any tables, I cut and glued a piece of brown felt to fit the bottom of the can. 
Now it slides easily and won't leave a mark!

To finish it off, I tied a raffia ribbon around the vase and glued it on at the bow so it wouldn't slip.

I added a printable label which I coloured in and tied around the bow.  It's a perfect addition to the owl rock magnets, so I gave them both to the lucky Leah for her 25th b-day on Saturday!
Link up you latest project every Wednesday on the Elle Belle Creative Your Way Wednesday link party!

Tuesday, September 13, 2011

Tequila Lime Marinated Chicken

It has been such a beautiful start to September that I've kept right on BBQ-ing and making salads. This past week has been a constant 30 degrees Celsius (about 86 F) so cooking is not high on my priority list-especially the use of my oven. So I was happy I got to try this recipe before it got too rainy to BBQ.

What You Need
3 Tbls olive oil
2 Tbls minced green onion
1 Tbls minced cilantro
1 Tbls chili powder
1 clove minced garlic
1/2 C tequila
4 Tbls lime juice
salt & pepper
3-4 boneless skinless chicken breasts

Mix all the ingredients together in a bowl, except for the chicken.  Put chicken breasts in a large plastic bag and pour marinade over.  Seal bag and let sit in the fridge for 3-4 hours.  Grill on medium high heat for 4-5 minutes each side. TA DA!

This is so simple! (as long as you remember to de-frost your chicken and get it ready early so it has time to marinate!)  I found the chili powder over powered the tequila/lime flavour, so I think next time I'll just pare it down to lime, tequila, maybe a bit of cilantro and salt and pepper. 
I served it with home made yam fries and basil garlic mayo (recipe below)


Yam Fries with Basil Garlic Mayo
Peel 3-4 yams.  Slice the yams legnth wise to create discs (this is easier said than done, make sure you have a sharp kinfe!).  Then slice these discs legnth wises again to create the fries.  Place on a baking sheet, drizzle with olive oil and season with chili power and salt.  Bake for at least 30 minutes at 400 F.  The basil garlic mayo is adapted from Giarda De Laurentiis recipe found here.  I blended 3/4 C Miracle Whip with 1 Tbls lemon juice, 2 Tbls fresh minced basil, salt and pepper to taste, and 1 clove of garlic minced.  Stir well and chill in fridge for about an hour to allow flavours to meld!  So yummy, even Ty liked it!

Now hurry up and try this before summer is gone!

Monday, September 12, 2011

Owl Rock Magnets

I am kicking butt at making projects I find on Pinterest.  I have made 3 things from my "Things to Make" Board!  Woo Hoo.  And these are really cute!
I just had to make these since we all know I have a bit of a thing for owls ...(I promise to take a picture of all the owlies/birds who now reside in our house soon)

These were SUPER easy to make.  Take in this gorgeous weather and go for a walk with your kids and let them pick rocks for you.  The flatter the better.  Then paint them all sorts of colours! Depending on the colour of paint you choose and the colour of the rock, you may need more than 1 coat.

Then get creative a paint some owly features on them.  Make sure you have a small paintbrush handy for those details.

I used sharpies to draw some features like beaks and the checkered bellies. WAY easier! Once all the details were done I used my handy glue gun to attach a button magnet to the back. Ta da!

And since I was giving these as a gift, I wanted a cute way to present them...think Leslie think.
I took the lid of an aluminum can, because it's metal and I knew the magnets would stick to it, but I wasn't sure how to keep the sharp edges from slicing the intended receiver.  Problem solved!

Glittery fabric.  I covered the one side (the inside that wasn't silver) with a piece of scrapbooking paper I hot glued down.  Then I hot glued the fabric to the front edge, making sure it looked nice.  Once the front was glued then I glued the fabric onto the scrapbook paper side! Voila!

This is a 2 part gift-stay tuned to see what I did with the can!  Another pinterest inspired project!

 
The Girl Creative


Thursday, September 8, 2011

Handmade Matroyshka Dolls

Have I mentioned that I'm marrying into a Ukrainian family.  Which really isn't that different than my German family (on my mum's side).  Well except for a few things...

Mennonites eat cottage cheese perogies
Ukrainians eat potato and cheddar
Mennonites don't drink or dance
Ukrainians are always drinking...which leads to dancing
Mennonite's LOVE cream gravy

Anyway.... one thing that both cultures share is the Matroyshka doll (Nesting Doll).  Which is actually a Russian doll but all those eastern European cultures are basically the same so there's bound to be cross over.  And when I saw this absolutely cute pattern for felt matroyshkas I KNEW I had to make them!  This is the first Pinterest project that I've completed! Feels good.

As with all projects, cutting the pattern is always the worst part-or is that just me?  Once that's done, start cutting the felt...

Pinning the pattern to the felt was really helpful!


In the original post, she used fabric glue to hold the pieces together while you stitch them...I didn't cuz I don't have any fabric glue....turned out fine!


Once you make one, it's really quite easy. 

1). Sew the face to the hood
2). Sew the hood to the belly
3). Embroider/sew felt decorations onto the belly
4). Sew the eyes, mouth and hair onto the face. 
5). Once the front is complete sew from the bottom right corner, all the way around to the left corner. TA DA!


Then stuff that dolly full!  And I mean full.  It's a little tough, but if you use a pencil to get the fibre in there, it's no problem.


I'm just so obsessed with these little gals!  They each take about 45 minutes to make (that includes me dropping my needle and trying to find it ...) I also attached a mini history of the Matroyshka onto each ornament.  I can't believe I'm already thinking about Christmas, but I'm going put one of these on every one's gifts this year!