Showing posts with label sister. Show all posts

Monday, March 16, 2015

It's a Sign

Hey Y'all! Happy March!  We just got a featured Post on Crafty Affaire Market's Facebook Page for our totally awesome banner!  Woo!


Remember this bad boy?


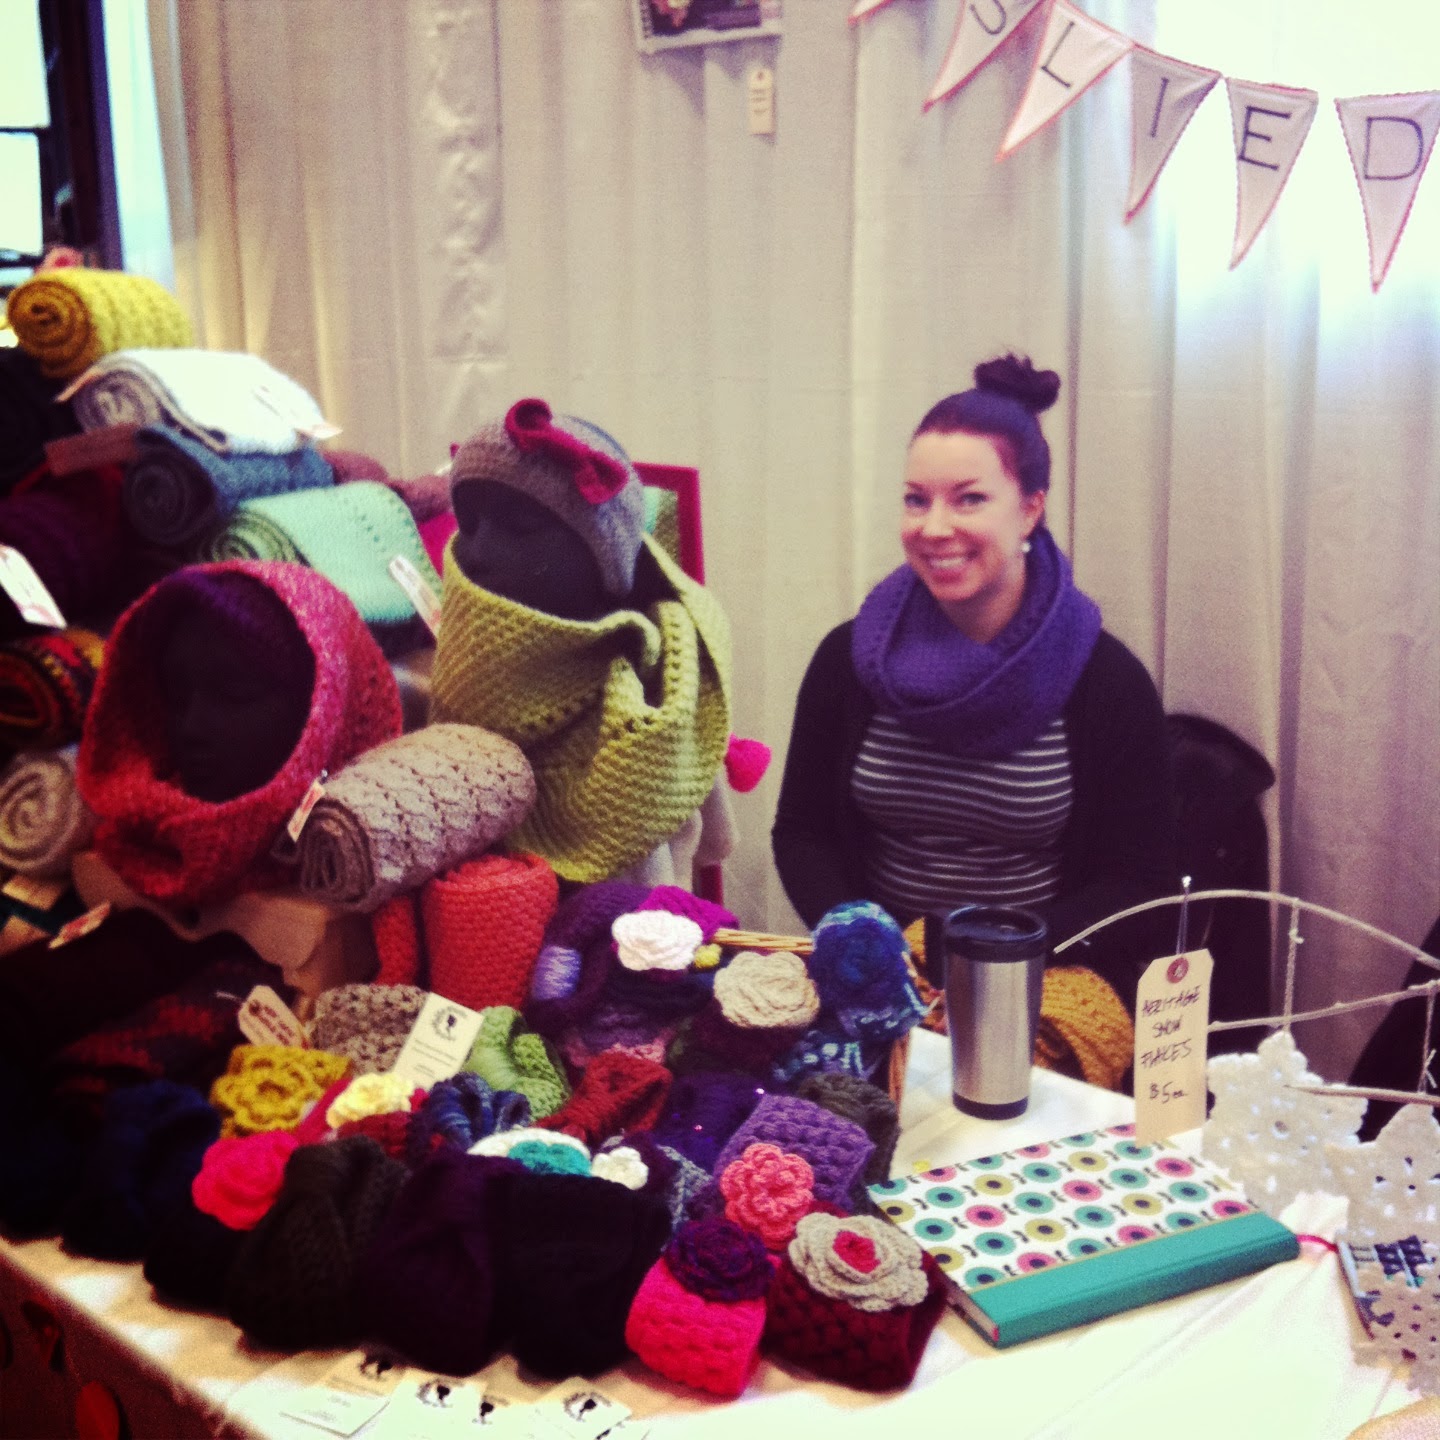
This is the new sign we made for our booth.  We really loved our old sign-it was coral, it was bunting, it was....hard to read.  Well that's what people told us. Oh, and their necks craned like puppies looking at a treat while they tried to read it. So we knew we had to change it!


We loved it and it fit our brand image but people couldn't read it, it was hard to hang up, and it got a bit washed out on a white background.  Sadly, our banner wasn't working.  

That's a hard thing to hear as a business owner;  that customers don't love something you made and that represents you  :(   So much work and effort went into creating this banner, it was hard to give up.  It IS important to remember that if it's not working, we have to let it go.

We took this situation and turned it into an opportunity for us to revamp our booth and sign!  


Firstly, we thought about how we wanted to be represented.  I'd recently had custom stamps made to use on my bags and tags so we chose to echo the look of the tags on our banner (BRAND CONSISTENCY!)  And we used the same font and same cameo silhouette logo.


We considered ordering a banner, but to keep costs low and have ultimate control over the final outcome we chose to make it ourselves.  Everyone's had that moment where you design something, send it to the printers and it never turns out the way you wanted :( We used my Silhouette Cameo to cut out a template for the letters and lined it up on the fabric.   For full details of how to make your own banner, check out Jill's post.


We attend shows that use both black and white pipe and drape, so we wanted something that would stand out on either colour.  Black fabric with white paint was a bold choice.  We chose classic colours with a lot of contrast.   This way if we ever chose to change our colours we wouldn't have to make a new sign.  We decided to edge the banner with some burlap ribbon so that it would stand out on black draping.

We made the sign about 6 feet long and 2 feet wide.  This gave us enough room to make the letters readable and to fill up the back of our booth. I know a lot of people put their banner on the front of their table, which I kindly advise against (if you have an option). It's too low to read.  People will have to back away from your booth/table to read it...and well, then they're far away from your goodies. If the show is really busy, there will always be people in front of it, and people just won't know who you are.

Due to not having a back wall, we had to hang our banner in front (less than ideal!)

Another key thing to remember when making your sign - think about how you'll hang it.  If we were to do it again, we might consider adding a couple of grommets to give it more durability when hanging.  

Remember our coral bunting sign?  Can you find it in the last picture with the sign on the back?  Yup!  We turned it around and used it for an extra pop of colour in our booth...and it gave us a NEW idea for our booth next year.  My booth design is constantly evolving, but I know this sign is here to stay.  It's bold.  It tells everyone who I am.  It associates a font and logo with my business (and then I use the same font and logo EVERYWHERE! Brand consistency and image.)

We hope this helps you with your branding and booth planning.  For more tips on how to make your booth its best, check out this post!    
We'd love to know which tip was most helpful for you! Leave us a comment and feel free to link to pics of your booth so we can ooh and aah!

Friday, July 4, 2014

Craft Sale Tips - Your Booth

Hi all you West Coast Leslie readers! I'm Jill, Leslie's little sister and I thought I would take over Leslie's blog today to start sharing some of tips and tricks we learned last year doing our first craft sale. 

(That's me!)

Even though it's summertime, we're busy gearing up for this year's fall, winter, and holiday markets!  Last year we did one big planned show (Crafty Affaire), and then a couple more later that happened to just come up.  This year our plans are bigger and better than last year.  

I figured that we're probably not the only ones that are thinking about this right now, and I definitely have some tips from experience that I haven't really seen anywhere else in my research.  Ready? Let's go!

Plan your product line - Pick a few main items!!!
The very first craft sale I did on my own was a few years back now and it was a bust for a couple reasons - one, it just wasn't the right crowd, most people weren't interested in buying (more show research might have helped here) but two - I was selling a bunch of different items.  People are easily overwhelmed.  Your product should draw them into your booth.  From a distance your customer should be able to see what you're selling.  You will make more sales like this and it will make your life easier! 

Here's what my booth looked like for that show:

Here's the booth Leslie and I set up last year:
Even with the pinky instagram filter you can easily see that the WCLD booth is much more coherent than my Envirocraftiness booth.  

Pre-plan your display
Know how much space you're working with, what display items you want, and where your product is going to be.  Set it up at home and then take photos so that 
a) you can use them when applying for shows (if required) and 
b) if you have family or friends helping you set up it's a good reference for them to know how to help.  

Will your booth look identical to your photos? Probably not, but that's okay! 

Here's Leslie's at home set up of her booth
Throughout the show you might need to move product based on what's selling or not selling.  Don't be afraid to deviate from your plan! 

When planning your display, here's a few things we like to keep in mind:

1) Does it look too perfect? You want people to touch and interact with your product.  If you can get people to pick up, feel, try on your product, you're much closer to making that sale! (more on that in the next post about sales!) It should be accessible.  Customers shouldn't have to wait for you to get something down for them to look at - some people WILL NEVER ask, and you just lost a potential sale.

2) Is all that really necessary?  Obviously you want to show off your product in the best way.  However depending on the length of show, the size of your booth, and what your product is, an elaborate setup may not be worth it.  I would  personally not be the vendor hauling a dresser to a show that's less than 16 hours, and even then, I'm not sure this would be my best strategy!!  Leslie and I have revamped this year's booth to include wine crates which both create depth and dimension, still allowing us to show off the product (you don't want your display to outshine what you're selling), and as a bonus, we can pack product in them.   Same goes for the trunk Leslie found, I foresee that being a great way to store additional inventory! 

Avoid clutter.  People get overwhelmed easily.  If you're not able to put all your merchandise out make sure you're familiar with your inventory so that you can grab it when a customer can't quite find what they want. 

What works to display jewelry is not going to work for big crocheted scarves, or handmade soap.  Look for ideas from people who sell similar or similar SIZED items as you.  ie what works for baking might also work well for selling soap!  

3) Does your customer know what you're selling?  This may sound obvious, but we were at a market where this one vendor had a phenomenal set up, but, we asked each other "do you know what she's selling?" 

4) Is your design appropriate for you product? This one has two meanings.  First you want your booth to represent your brand.  You want your colors and logo to stand out.  One mistake we made was that people struggled to read our "West Coast Leslie Designs" banner - we'll be revamping this for sure!  While we wanted that cute bunting banner which matches our brand image, it caused confusion and could better represent the WCLD brand.   
Secondly, the branding of your business should match the product you sell.  For instance, a booth across from us sold dog treats.  Here's a pic of their setup:
Simple, clean, and you can see the product and price list right out front, and they have a great visually attractive and self explanatory sign right there!  PS. These guys from Sparky Snacks were some of the awesome people we became friends with at the show! 

Now think of how it would look if they had a crafty vintage setup like our WCLD booth...weird right?  Make sure your design matches what you're selling.

5) Don't forget that YOU are part of your display!
Don't have so much "display" that there's no room for you.  Don't sit behind a table piled high with product.  Make sure you have ample room to move around, access your product and are available and approachable to help customers.  Wherever possible, wear your product (if it's wearable!)...and this leads me into my favorite selling tip:

Before I tell you what my FAVORITE selling tip is I want to give you a sneak peek at what's coming up:

Updated West Coast Leslie Designs booth - see how we've revamped our booth for 2014 and applied these tips

Leslie and Jill's best tips to selling like pros and making your sale fun and profitable! 

Alright, now here's what you've been waiting for.... one of my favorite sales tips of the weekend:
Be a walking model.  Wear sellable items and DO sell the shirt off your back (or scarf around your neck, as the case may be).  Often people were drawn to the scarf I was wearing, they can see how to wear it, how it fits, how it works with your coloring, etc.  If they express ANY interest in the piece you're wearing, take it off, offer it to them to touch, try on, etc.  This works for some people, but not for others.  If the customer feels awkward about buying "your" item.  Casually put it down on the table and keep helping them.  Once the scarf is on the table, BOOM! it's back to being part of the merchandise and it's not longer a weird "personal issue."  Chances are they will buy it.  

A big part of being successful with this technique is to look well groomed.  Obviously for your show you want to look good, but if you notice, all the pics of me I'm wearing my hair up.  I shed like MAD! Nothing is ickier than stray hairs on things you want to buy.  So in order to sell the scarf I was wearing, it definitely helped to be well groomed and not be overly scented (good or otherwise)!

I'm headed out to Vancouver to hang with Leslie and work on our fall strategy towards the middle of the month, definitely be sure to come back and check out our progress and great tips to make your sale more successful too!

What have you found works for you when designing your booth? What ideas have flopped? Share with us in the comments! 

Tuesday, December 10, 2013

Crafty Affaire Wrap Up!


That's a wrap! Whew!  What a whirlwind weekend!  I still feel like I have so much to do - send thank you cards, email all my lovely new friends, post more pics, re stock my inventory....BUT I wanted to share my experience of my FIRST craft sale ever with you!


 I'll fast forward through the crummy parts LIKE my Mum and my sister getting delayed and not arriving on Thursday night, but arriving on Friday morning.  The market itself was super fun, it started early on Saturday morning with set up.

 Here's a closeup of my booth in the morning, before we started playing dress up, trying on and unrolling pretty much every scarf!


Here's my employee of the weekend.  Workin' away :)  Jill (the gal behind Envirocraftiness) was a huge help - how else could I take bathroom breaks?!? LOL She also doubles as a model!

 My mum was also a big help.  Here she is with Jill, both of who were working on scarves! It's nice to see how things get made, hey?
Day one went by pretty quick!  We were very busy and felt like the darlings of the market!  A long but very fun day.

 I could take pictures of my products all day!  The colours!


 DAY TWO!  We are ready!
 Jill wasn't sure about her top knot & purple scarf combo, 
but I love it!  She said she didn't feel like it was "her style" 
but I think it grew on her!  We couldn't believe this purple scarf wasn't snatched up on the first day - but it did eventually go to a great new home!

I wasn't sure I could sell any scarves to men, so I got Ty to model for me!  Doesn't he look handsome? I'm a lucky gal :)

More product.  We couldn't even put everything out on day one!

One of the best parts of the whole weekend was meeting and hanging out with AWESOME new people like Chandra of Bookas! Seriously, this girl is my new BFF.  She picks the cutest fabric for her goodies and makes adorable kids products.  And she is rocking her very own West Coast Leslie infinity scarf! I can't wait to hang with this chica at another craft show :)
 And meet Rita, my across the way vendor buddy who owns Sparky Snacks!  She was one of my first customers of the weekend.  
Doesn't that teal scarf look amazing on her!?!? 

I met so many great people including the lovely and talented Ginna & Tomoko who organize/run the Crafty Affaire Markets! Thanks so much for making my first craft fair so fun (not to mention successful).  I have definitely been bitten by the craft fair bug and can't wait for the next one!

And hey, if you're looking for a last minute christmas gift I do have some stock leftover, ready to ship!  Aren't you lucky?  
So check out my Facebook to see what's available.

Sunday, May 12, 2013

You don't make friends with Salad! {Jill}

It's Salad Sunday and today we've got a great post from my little sister Jill from Envirocraftiness.  I should mention that she is headed out to Vancouver on WEDNESDAY! and I can't wait.  We'll be doing SO MUCH CRAFTING-you're gonna be overloaded with amazing goodness.  BUT until then, enjoy!

Hey all you Try to Keep Uppers! This is Leslie's little sister Jill from Envirocraftiness!  I've been on a grain/gluten-free-paleo kind of diet, and this salad was one of my experiments along that path.  Thanks to my big sis for inviting me over here (although I handle the technical stuff for her, so really I can hop over whenever I like!) I'll probably be back with more salads later in the summer! Enjoy! 

This salad is pretty much an original creation.  It all came about because I was at work, thinking, what do I want for supper?  The answer was "a steak and eating an avocado with a spoon."  And then I remembered I'm a grownup, and probably shouldn't eat an avocado with a spoon.  SO I created this salad instead!

 photo 7A38E512-B1C7-4D70-9526-5AD4EC76A0E5-15502-00000AAFF6D13B2F_zpsdfd6df8d.jpg

What you need:
2                ripe avocados, chopped
1/2             English cucumber, chopped
1                small roma tomato, diced
                  crumbled feta cheese (adjustable to personal preference)
                  balsamic vinegar (adjustable to personal preference)

Toss all your veggies and cheese into a bowl.  
Pour balsamic vinegar over all of it, and stir! 

 photo 827A2A30-AF7B-4EEE-8598-895253284E16-15502-00000AAFEFC5E8B1_zpse9bf57d8.jpg

Serve up with a steak done your favorite way! We still had a solid wall of snow blocking the BBQ when I made this, so I settled for pan-fried (is that what you call it?!) with some Montreal steak spice.

 photo 3B118269-836C-456E-9D21-343A876A77DD-15502-00000AAFF36011F8_zps973e109c.jpg

There you have it - a quick, easy, and grain free meal!

 Heaven!

Feel free to visit me for more crafts, recipes and fun over at Envirocraftiness!!  

~JILL


Monday, March 11, 2013

Blog Jacking Guilt

I hope y'all enjoyed the blog jacking last week.  My little sister Jill blog jacked me to share that I have never made lasagna.  I know?!?! Never made it.  It seemed so finicky.  I also don't have my Dad's recipe so I used that as a good excuse.

Anywho, I buckled down and made lasagna!

I used the same ingredients that she did, except that I used Trader Joe's No Boil lasagna noodles (that was fun-keep reading to find out!)


Just like Jilly said, sauté your onions, garlic and brown the ground beef.


Then get your noodles ready.  I was using no boil noodles, which I've never done before.  So I decided to pour boiling water over them to soften them up a bit before I put them in the lasagna.  Ha ha ha, they stuck together SO bad!  Don't do that!


Then I put my cottage cheese and spinach and egg together.  Unlike Jill I used dry curd cottage cheese.  That's what my Dad always used, so that's what I used.  I also feel like if you use wet cottage cheese your lasagna is too sloppy!


Mix it up with the spinach.


Chop your parsley, and once your meat is done add in the parsley and sauce.


Let that simmer for about 5 minutes and then stack it up!  Unlike Jill I started with a layer of noodles.

Noodles, sauce, noodles, cheese, noodles, sauce, noodles, sauce, cheese.  You got that?


Now it's ready for the oven!

Bake for 40-45 minutes.  
Let it rest for about 10 minutes before serving. 


Friday, March 1, 2013

THIS IS A BLOG-JACKING...for lasagna!

Hi all you Try to Keep Uppers (hmmm, that doesn't sound quite right?!) I'm Leslie's little sister Jill from Envirocraftiness.
 
Now there are rumours that my sister is a bit of a foodie.  I've even heard that some people are impressed and intimidated by her skills in the kitchen.  While Leslie does cook up some good eats, I have a secret to share with you.

SHE CLAIMS SHE DOESN'T KNOW HOW TO MAKE LASAGNA.  

So I'm here to out her publicly and share my favourite recipe with you!

 photo 264DF79D-B318-4ABA-8702-240562306207-20010-00000D1F7CC7CC64_zpsb6adc550.jpg

It's really top secret...  and by top secret, I mean it's the one off the back of the Catelli noodle box!

 photo 6B21B6FD-3AFC-4AA3-A976-E8B1AAC19830-20010-00000D20496909C2_zpscfb9b49f.jpg

What you need:
12             lasagna noodles
1               medium onion (chopped)
1               clove of garlic (minced)
2 tbsp       olive oil
1+ lb        ground beef
2              jars of pasta sauce (700mL ea)
1/4 cup    chopped parsley
2 cups      cottage cheese or ricotta (the wet cottage cheese in the tub is just fine!)
1 pkg       chopped frozen spinach
1              egg
3/4 cup    shredded mozzarella cheese

Cook noodles according to package
 photo CACB8265-D209-4DF4-B351-D8644C8041BB-20010-00000D1FCEF1F3A0_zps6d8d6e58.jpg

As the water is coming to a boil, heat up your oil in a large pot over medium heat.  Also, if your spinach is still really frozen pop it in the microwave on defrost right now!
 photo D0FE7CDE-B469-4DBC-A724-95026AAF588E-20010-00000D1FD24721CD_zps2d2dd463.jpg


Sauté onion and garlic in oil until tender
 photo 2A1CD13C-FAC7-470C-AE6D-7BEB7770556E-20010-00000D1FDA52A8B7_zpsd3a8388d.jpg

Add ground beef and cook until browned
 photo 8443FF95-DB4F-4C99-9E2A-6857116C7926-20010-00000D1FC5A68DF7_zps35553b3c.jpg

By now your spinach is probably coming along
 photo 8CED46E7-78B9-4C0E-BBD4-ABE85136F779-20010-00000D1FC11684B0_zps0c1c9682.jpg

and your noodles are cooking away
 photo AC887C9D-9726-4466-AFFE-29629078A06F-20010-00000D1FB93190DC_zps4c787d5a.jpg

and your beef is heading to brownville
 photo 40761E62-D621-4E9A-B47F-FE5AC386ECED-20010-00000D1FBD127DCC_zps156b6c25.jpg (ewww, that looks terrible!)

When noodles are done cooking, drain, and rinse with cold water (to stop the cooking process).  I usually just put the whole colander back over the pot until I'm ready for the noodles.
 photo BF051560-58F4-4871-92FD-17E23132F17C-20010-00000D1FAE7E2E23_zpsa6bbf01d.jpg

Squeeze as much water out of the spinach as you can.  I just grab it with my hands and squeeze by the handful!

Mix your cottage cheese, egg and DRAINED spinach in a medium sized bowl.
 photo 92D361D6-2A94-4C35-B0F1-B09FB4EBBEFE-20010-00000D1FB1FC2488_zpsbc7d69c8.jpg

Add both jars of sauce to the meat mixture and let simmer for 5 minutes.

Now you have 3 distinct parts:
 photo 6A19BFDA-929D-41CC-A4EF-F8C97A9B085C-20010-00000D1FAA536DF5_zps0e77b371.jpg

Noodles
Spinach mixture
Meat sauce

Layer 1 - meat sauce
 photo 2EB50834-FEBB-4AE8-BAB7-864BF3FEEBEA-20010-00000D1FA5EAF313_zps46c705ca.jpg

Layer 2 - noodles
 photo B1288A4F-C9F3-440D-A2E2-699547C62B30-20010-00000D1FA1EEC5B3_zps43b71308.jpg

Layer 3 - meat sauce
 photo AC038791-3DCA-4394-803F-95D693ED5E1E-20010-00000D1F9E63A21C_zps1b67f4f9.jpg

Layer 4 - noodles
 photo 0E95A5AB-2249-426E-98AC-F5A88D9ED399-20010-00000D1F9A526BFA_zpsef5e3727.jpg

Layer 5 - SPINACH MIXTURE
 photo 473C592F-C833-4EF6-86BA-35E80A196534-20010-00000D1F95D33E65_zps0e3ebfd2.jpg

Layer 6 - noodles
 photo 360042EB-20F3-4E7F-A397-85799B9F5EEC-20010-00000D1F91EDC6AE_zps0f1fcf55.jpg

Layer 7 - meat sauce
 photo 6CDAED40-3B55-45AC-A118-2DCB3124C76F-20010-00000D1F8DAB6F1E_zps7a6cb61d.jpg

Layer 8 - noodles
 photo 0E95A5AB-2249-426E-98AC-F5A88D9ED399-20010-00000D1F9A526BFA_zpsef5e3727.jpg

Layer 9 - meat sauce
 photo 6CDAED40-3B55-45AC-A118-2DCB3124C76F-20010-00000D1F8DAB6F1E_zps7a6cb61d.jpg

Top with cheese
 photo 8D07DABC-E9F5-4BDE-9212-FAF15B233EF6-20010-00000D1F8997F0FB_zps7b68d582.jpg

Bake at 350 degrees F for 40-45 minutes uncovered.  If your lasagna pan is very full, put it on a cookie sheet to help keep your oven cleaner! Let stand for 15 minutes before serving.

 photo 6DFF4758-CD56-4ECE-8C7A-80FA37D977F8-20010-00000D1F8604CC0B_zps4872d8b6.jpg

 photo 264DF79D-B318-4ABA-8702-240562306207-20010-00000D1F7CC7CC64_zpsb6adc550.jpg

Thanks for making it through this insane picture post with me!

Leslie, make your husband some lasagna!

In the future I want to try making gluten free lasagna that uses eggplant slices as noodles!
 
It's been a slice! Come check me out over at www.envirocraftiness.com
 

~JILL